ReliaSoft desktop applications can be deployed with a SQL Server database for centralized data storage. With enterprise-wide, database-driven software applications such as these, it is important to have established procedures to assure that proper database maintenance and backup activities are being performed. These activities are the responsibility of the organization that implements the system (since our support personnel do not have access to, or specific knowledge of, the IT infrastructure used to deploy the system). This document presents our recommendations for the minimum database backup and maintenance activities that should be performed in SQL Server to protect the organization's data and keep the system running smoothly.
Click the appropriate link to jump to the instructions for your version of SQL Server. This document contains instructions for creating backups in:
Note: To view the instructions for creating backups in Oracle, see http://www.reliasoft.com//content/hbkworld/global/en/migration/reliasoft/en/using-oracle-enterprise-databases.html. To view the instructions for creating backups in SQL Server Express, please see http://www.reliasoft.com//content/hbkworld/global/en/migration/reliasoft/en/sql-server-express-backup-instructions.html.
SQL Server 2008 Backup Instructions
We make these two minimum recommendations for maintaining SQL Server 2008 databases:
- Create a Database Maintenance Plan that creates a Full backup within SQL Server.
- Create a Database Maintenance Plan that creates a Transaction Log backup within SQL Server.
Create Full Backups Using a Database Maintenance Plan within SQL Server 2008
- Open the SQL Server Management Studio by choosing Start > Programs > Microsoft SQL Server 2008 > SQL Server Management Studio.
- Expand Management and right-click Maintenance Plans. Choose Maintenance Plan Wizard.

- Click Next to proceed past the start page and to the first step of the wizard. Type a descriptive name for your maintenance plan.
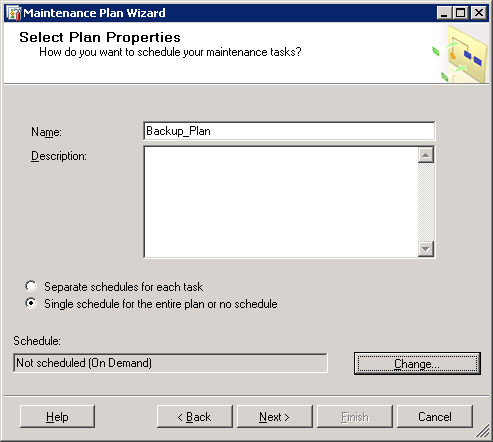
- Make sure Single schedule for the entire plan or no schedule is selected (we will use the same schedule for all the tasks in this maintenance plan). Click the Change button to open the Job Schedule Properties window.
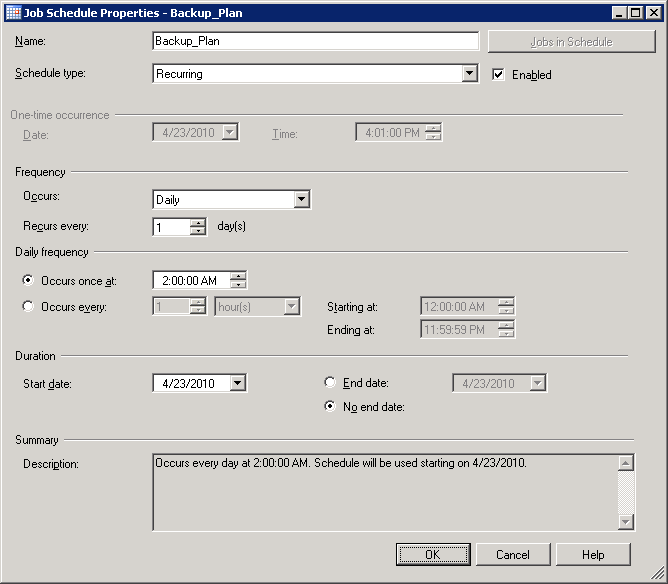
- Choose Recurring for the Schedule type and select the Enabled check box. In the Frequency section, choose Occurs Daily and Recurs every 1 day. In the Daily frequency section, specify a time when the database is least utilized (e.g., 2:00 AM). Click OK.
- Click Next to proceed to the Select Maintenance Tasks page.
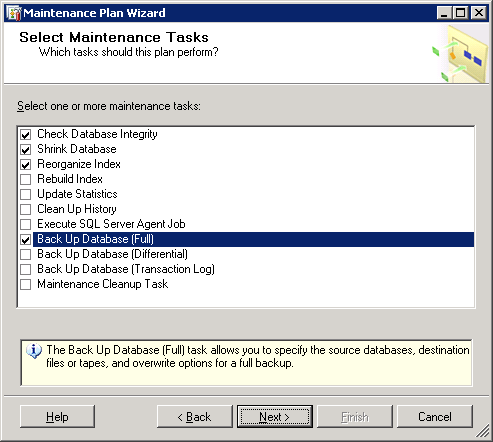
- In the Select Maintenance Tasks page, select Check Database Integrity, Shrink Database, Reorganize Index and Back Up Database (Full). Click Next.
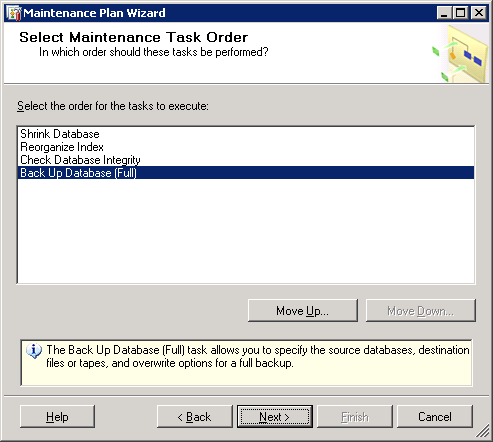
- On the Select Maintenance Task Order page, use the Move Up and Move Down buttons to arrange the tasks in the following order and then click Next.
- Shrink Database
- Reorganize Index
- Check Database Integrity
- Back Up Database (Full)
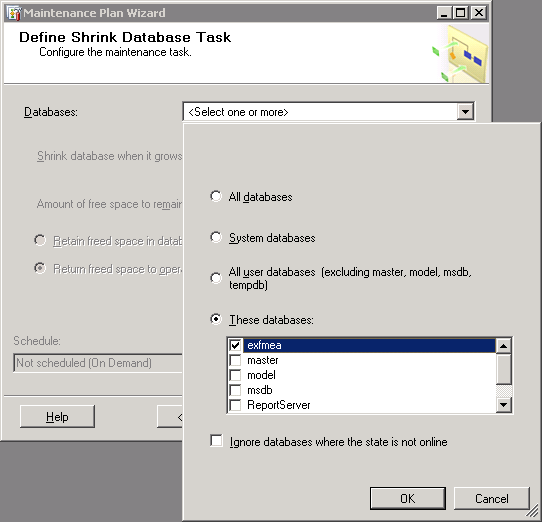
- On the Define Shrink Database Task page click the down-arrow to the right of Databases and choose your database from the list. Click OK to close the database selection window. Keep the default values for Shrink database when it grows beyond (i.e., 50 MB) and for Amount of free space to remain after shrink (i.e., 10%). Click Next.
- On the Define Reorganize Index Task page, click the down-arrow to the right of Databases and choose your database from the list. Click OK to close the database selection window. Click Next.
- On the Define Database Check Integrity Task page, click the down-arrow to the right of Databases and choose your database from the list. Click OK to close the database selection window. Click Next.
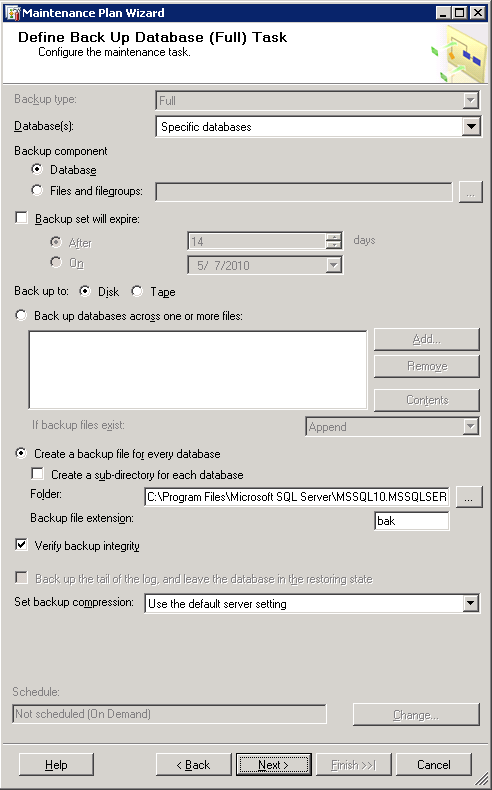
- On the Define Back Up Database (Full) Task page, click the down-arrow to the right of Databases and choose your database from the list. Click OK to close the database selection window. Choose the media for the backup (i.e., Disk or Tape) and the location for the backup. Select Verify backup integrity. Click Next.
- On the Select Report Options page, you can choose to have the maintenance plan generate reports. This is optional. Click Next.
- The final page of the wizard summarizes the Maintenance Plan and the tasks that will be run. Click Finish.
- The Maintenance Plan Wizard checks the settings and then adds the job to the SQL Server Agent Jobs and will run at the next scheduled time.
Create Transaction Log Backups Using a Database Maintenance Plan within SQL Server 2008
Note: These instructions follow the same steps as above, but because we suggest running transaction log backups throughout the day (this may vary depending on your business needs), we suggest creating a separate Maintenance Plan, which has a more frequent schedule than once a day, for the transaction logs.
- Open the SQL Server Management Studio by choosing Start > Programs > Microsoft SQL Server 2008 > SQL Server Management Studio.
- Expand Management and right-click Maintenance Plans. Choose Maintenance Plan Wizard.

- Click Next to proceed past the start page and to the first step of the wizard. Type a descriptive name for your maintenance plan (e.g., MaintenancePlan-Transaction_Log).
- Make sure Single schedule for the entire plan or no schedule is selected. Click the Change button to open the Job Schedule Properties window.
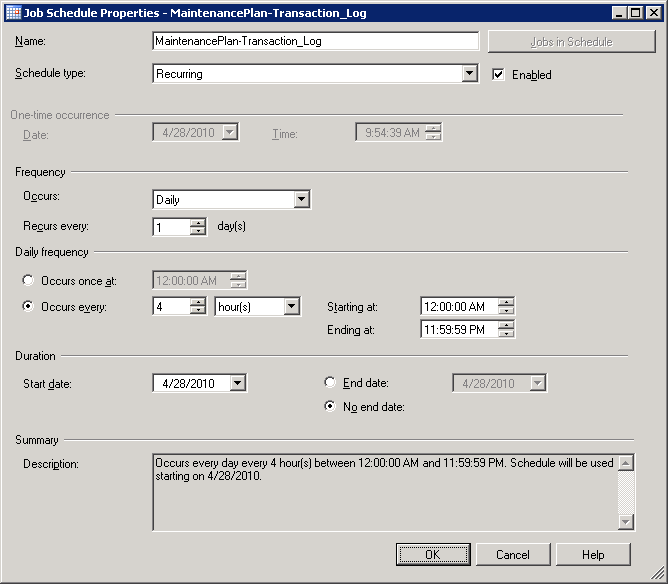
- Choose Recurring for the Schedule type and select the Enabled check box. In the Frequency section, choose Occurs Daily and Recurs every 1 day. In the Daily frequency section, select Occurs every and choose 4 hours and Starting at 12:00 AM (assuming that you have followed the previous section's suggestion and set the full backup to 2:00 AM -- to ensure it will not be running at the same time as the full backup). Click OK.
- Click Next to proceed to the Select Maintenance Tasks page.
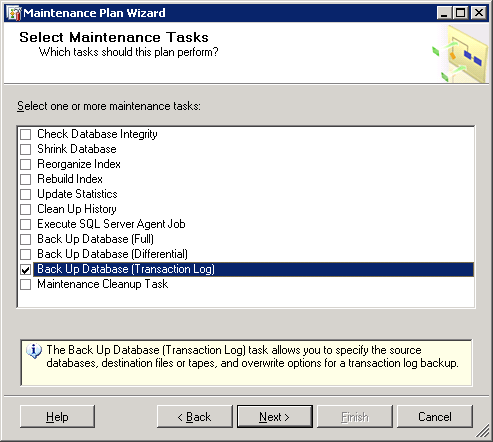
- On the Select Maintenance Tasks page, choose Back Up Database (Transaction Log). Click Next.
- On the Select Maintenance Task Order page click Next.
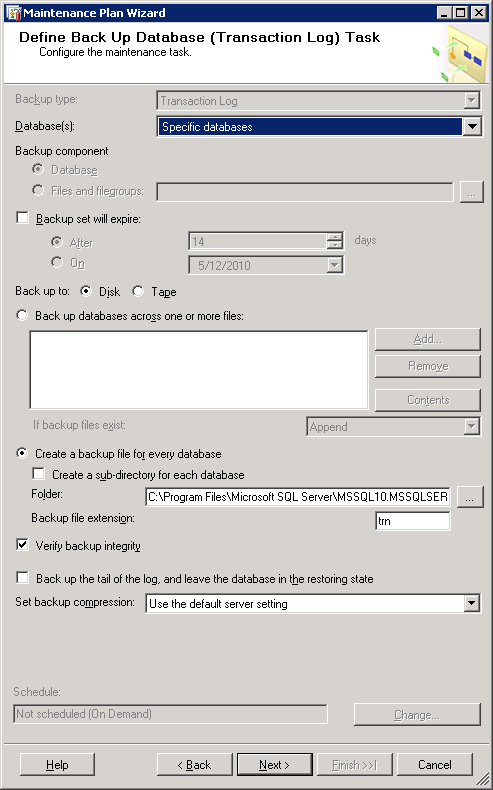
- On the Define Back Up Database (Transaction Log) Task page click the down-arrow to the right of Databases and choose your database from the list. Click OK to close the database selection window. Choose the media for the backup (i.e., Disk or Tape) and the location for the backup. Select Verify backup integrity. Click Next.
- On the Select Report Options page, you can choose to have the maintenance plan generate reports. This is optional. Click Next.
- The final page of the wizard summarizes the Maintenance Plan and the tasks that will be run. Click Finish.
- The Maintenance Plan Wizard checks the settings and then adds the job to the SQL Server Agent Jobs and will run at the next scheduled time.
SQL Server 7.0 and 2000 Backup Instructions
We make two minimum recommendations for maintaining SQL Server 2000 and earlier databases:
- Set the Recovery Model to Full.
- Create a Database Maintenance Plan that creates a Full backup within SQL Server.
Set the Recovery Model to Full within SQL Server 2000 and Earlier
- In the SQL Sever Enterprise Manager, right-click the database and select Properties.
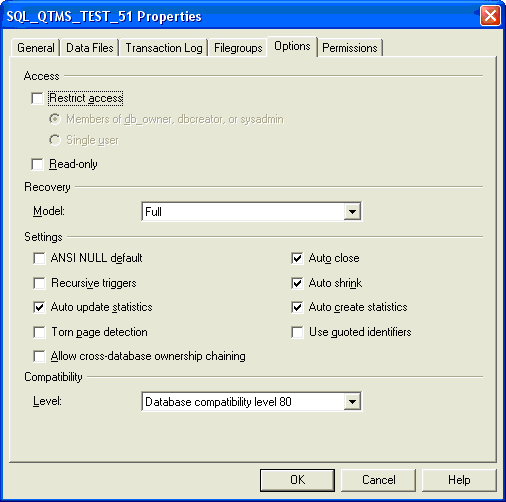
- Go to the Options page. Choose Full for the Recovery Model, as shown next. Click OK.
Create a Database Maintenance Plan within SQL Server 2000 and Earlier
- Launch the SQL Server Enterprise Manager and use the hierarchy to navigate to your server. Under the server, expand the folder called Management.
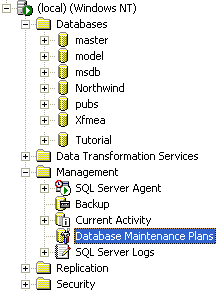
- Under Management, right-click Database Maintenance Plans and select New Maintenance Plan to start the Database Maintenance Plan Wizard.
- Click Next to proceed to the first page of the wizard. When prompted to select the databases for which to create the maintenance plan, we recommend choosing the application database, "master," "model" and "msdb," but only the application database is required.
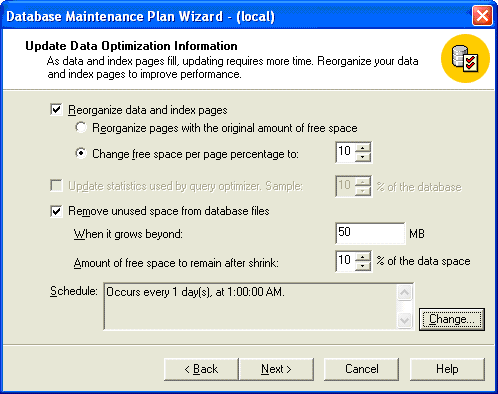
- Click Next to proceed to the next page of the wizard, Update Data Optimization Information, as shown below.
- Select Reorganize data and index pages and Change free space per page percentage to 10.
- Select Remove unused space from database files and keep the default value of 50 MB.
- It is recommended to change the schedule to daily, to be done after hours. Also, if your backup is to tape, it is recommended to have this performed before that process. The time it takes to complete the maintenance depends on the size of your database and the hardware used to host the database.
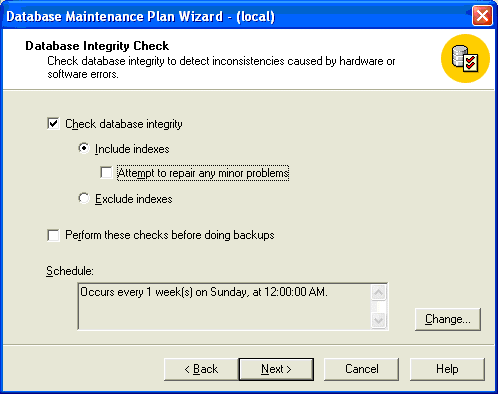
- Click Next to proceed to the next page of the wizard, Database Integrity Check, as shown below.
- At minimum, select Check database integrity and Include indexes. Do not select Attempt to repair any minor problems since the given database must be in single-user mode to use this value.
- You may accept the schedule default value of once a week or you may change the schedule.
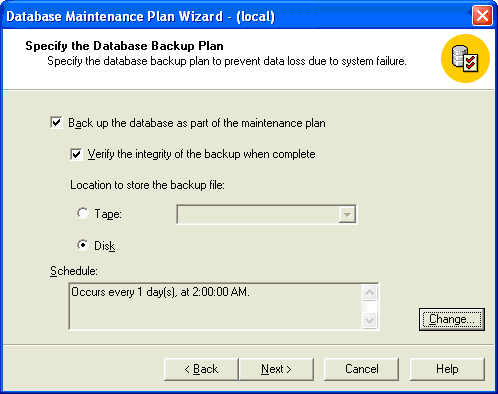
- Click Next to proceed to the next page of the wizard, Specify the Database Backup Plan, as shown below.
- Select the options to Back up the database as part of the maintenance plan and Verify the integrity of the backup when complete.
- Set the location to Disk.
- Schedule daily backups. If you have a system tape backup, then schedule the database backup to occur before the system tape backup.
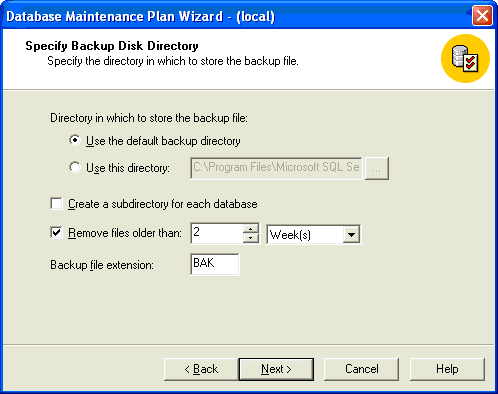
- Click Next to proceed to the next page of the wizard, Specify Backup Disk Directory, as shown below.
- You may use the default backup directory or specify your location.
- If you specify the Create a subdirectory for each database option, the system backs up each database into separate folders.
- Select the Remove files older than option, and specify how long to retain previous backup files. Usually, removing files older than two weeks will be adequate. Of course, this depends on the database size, the amount of free space on the system hosting the database and your organization's preferences.
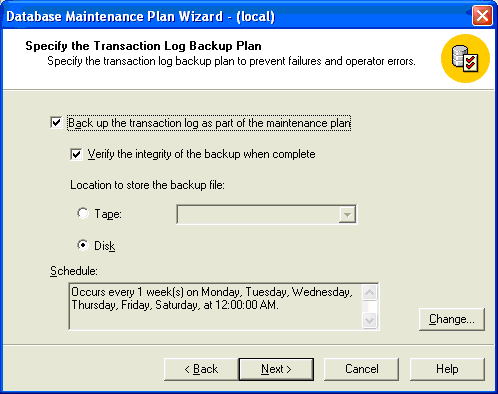
- Click Next to proceed to the next page of the wizard, Specify the Transaction Log Backup Plan, as shown below.
- Select the options to Back up the transaction log as part of the maintenance plan and Verify the integrity of the backup when complete.
- It is recommended to backup the transaction logs every 2 to 4 hours during normal business hours. Each environment is different, so you should set these options based on the acceptable amount of data loss in case of a failure.
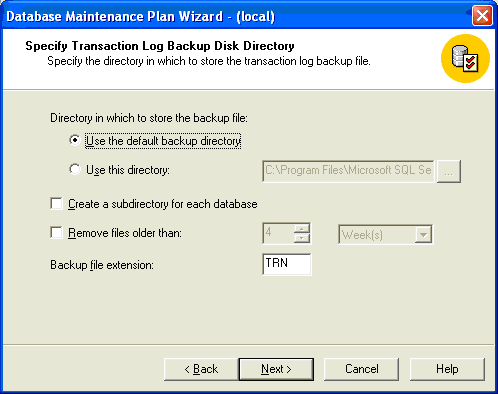
- Click Next to proceed to the next page of the wizard, Specify Transaction Log Backup Disk Directory, as shown below.
- It is recommended that you choose the same options as you did for the database backup location.
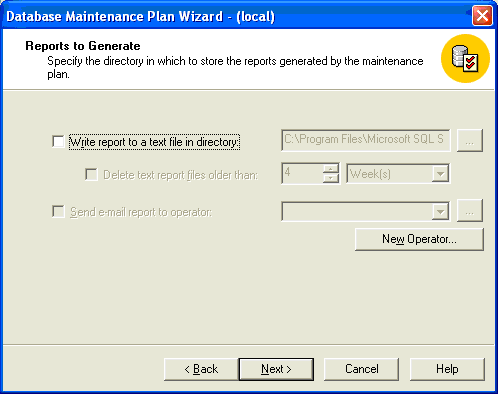
- Click Next to proceed to the next page of the wizard, Reports to Generate, as shown below.
- If you choose, you can have the maintenance plan generate reports. This is optional.
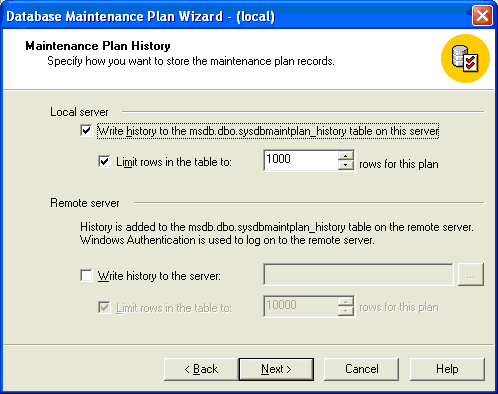
- Click Next to proceed to the next page of the wizard, Maintenance Plan History, as shown below.
- The default options are usually adequate. You can view the history by right-clicking the Maintenance Plan under Database Maintenance Plans under Management and selecting Maintenance Plan History.
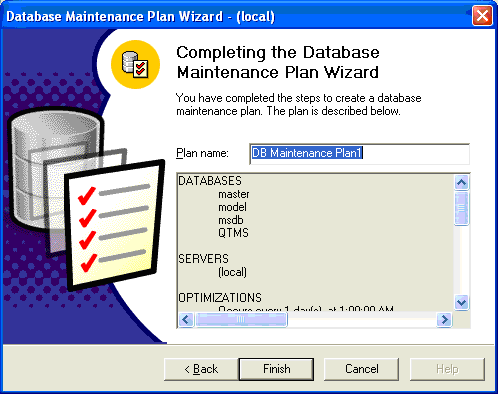
- Click Next to proceed to the final page of the wizard, as shown below.
- Name your plan and click Finish.
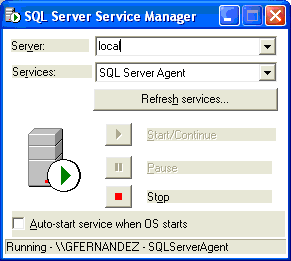
Execution of the Maintenance Plan requires that the SQL Server Agent be active. The system displays an error message if the SQL Server Agent is not active. If necessary, activate the SQL Server Agent the same way you activated SQL Server.
- To start this service, click the SQL Service Manager located in your system tray by the clock.
- Select SQL Server Agent and start it. You will probably want to select the Auto-start service when OS starts check box also.
- After this, your maintenance plan should run as scheduled.
